
This is the work of God, that you believe in the one he sent
John 6:29
Intro
Why not have some fun with Unity as a former TR fan and make something like a main menu? For instance, this is what the main menu of “Tomb Raider 3 Remastered” looks like.
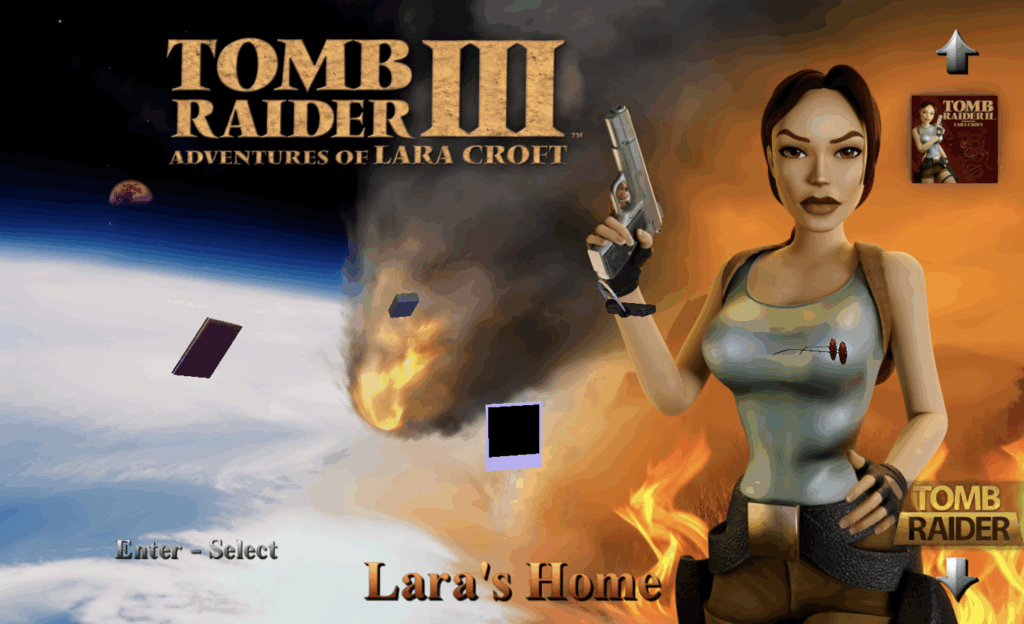
Let’s do something similar!
Assets
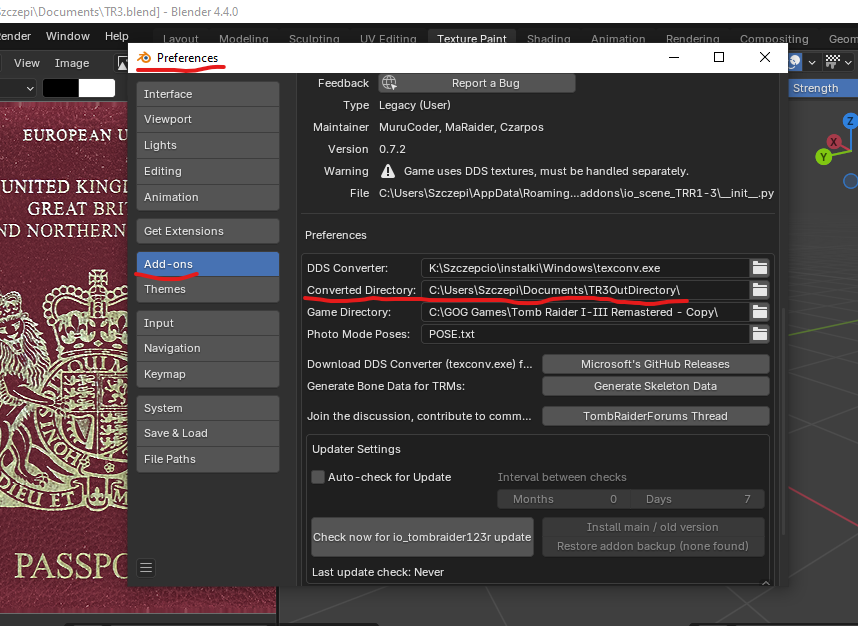
Since it is relatively easy to extract visual and audio elements from the remastered series, we will need “Tomb Raider I-III Remastered” (can be bought on gog.com) and Blender with TR123R-Blender-Addon. Blender and the addon are required to extract the original meshes and textures.
Two assets can be grabbed without any effort. The first one is the main menu sound (GOG Games\Tomb Raider I-III Remastered\3\TRACKS\5.OGG) and the background (GOG Games\Tomb Raider I-III Remastered\3\PIX\HD\TITLE_EU.DDS).
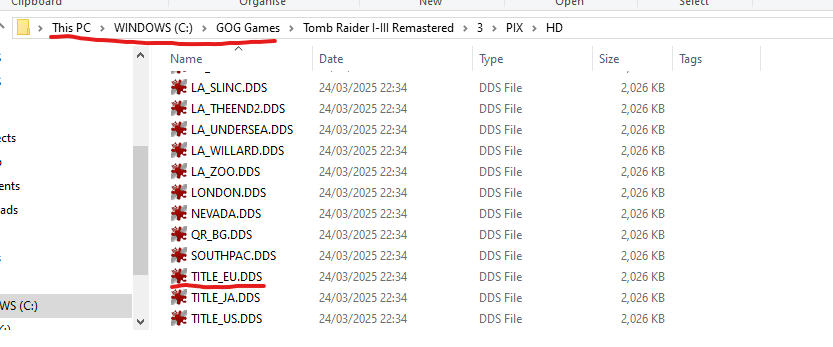
Although the background is in the DDS format, it can be quickly converted to any format you want using Irfan View and one of its plugins (Formats). Please note that fonts are also stored as DDS files. For example, GOG Games\Tomb Raider I-III Remastered\3\TEX\FONT0.DDS contains English letters.
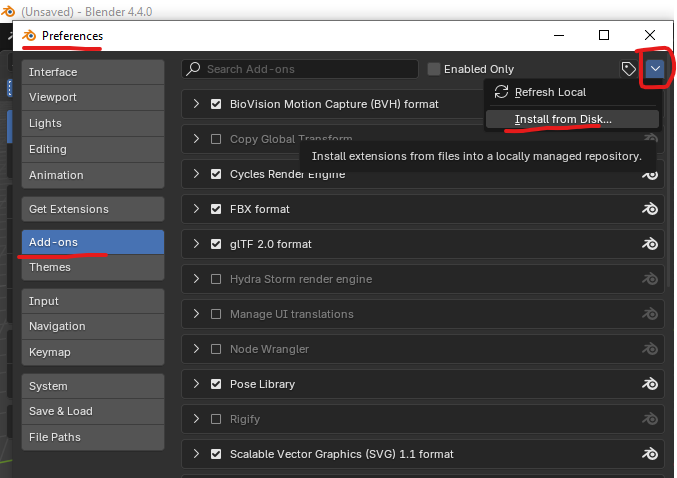
Now, let’s move to Blender and the addon. To install TR123R-Blender-Addon, download the zip file, open Blender, navigate to Edit -> Preferences ->Add-ons, click “Install from Disk” and select the zip file. Then configure it as README.md states.
Here is a list of meshes used as menu items in the main menu scene:
- PASSPORT_OPTION
- SOUND_OPTION
- DETAIL_OPTION
- CONTROL_OPTION
- PHOTO_OPTION
You can select each one and export it (Blender -> File -> Export -> Wavefront)as an OBJ file, and then import it into Unity.
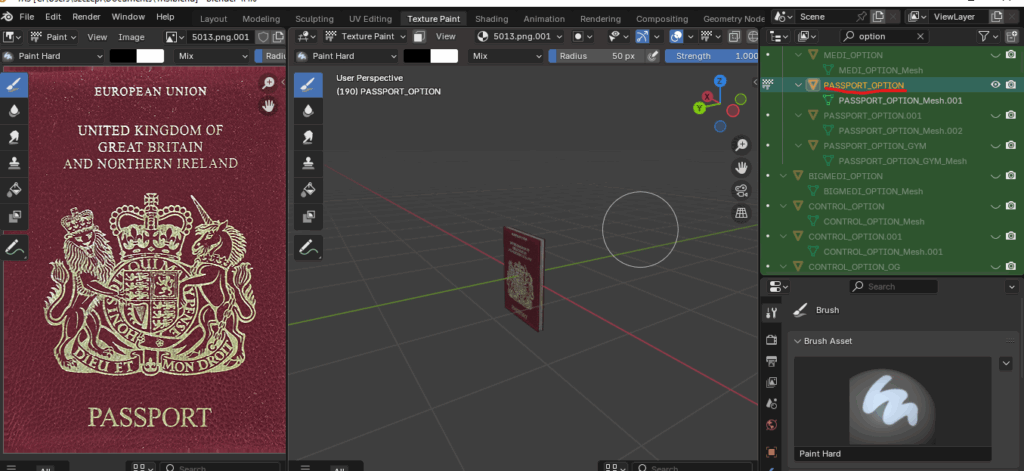
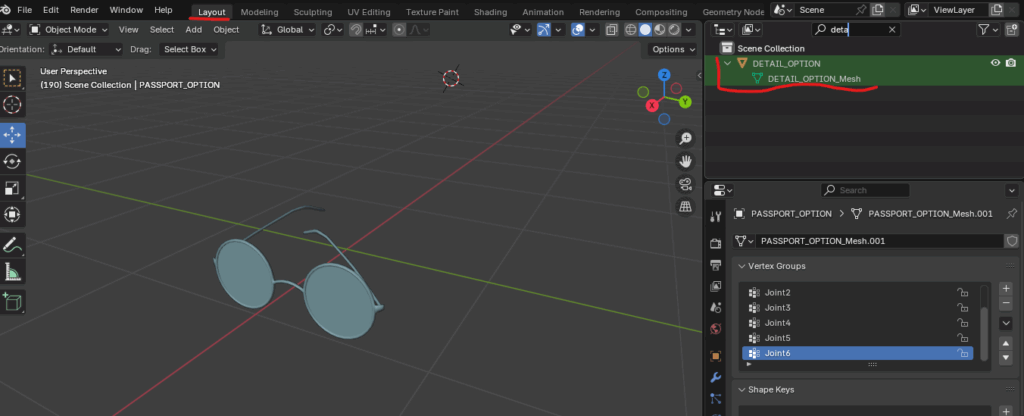
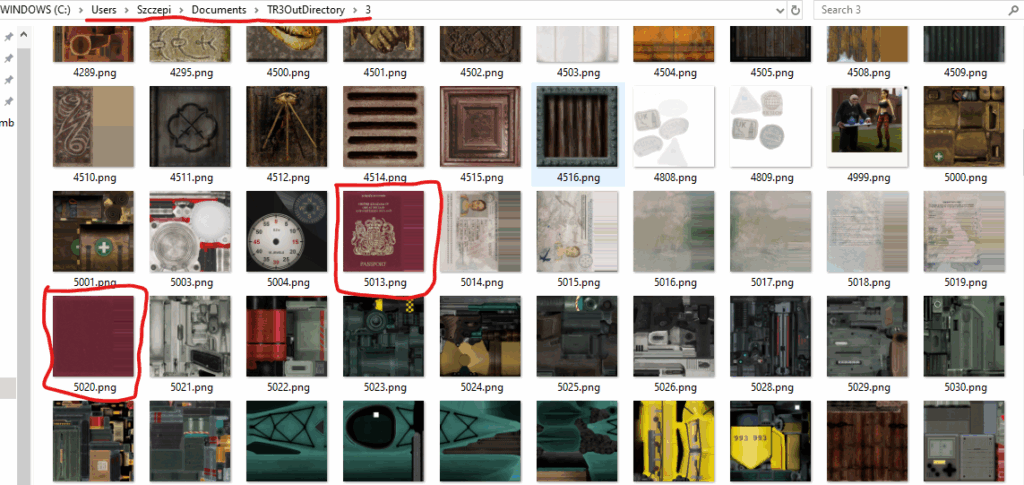
Textures should be located in the “converted directory”.
Development
Although at this point we should be ready for development, first, a small disclaimer 😛. The approach to implementing the game elements presented below is not ideal, and I chose it only to get to know Unity better and have some fun 😁👨💻. Secondly, the description here will be more like a personal (and chaotic? 🙃)notes rather than detailed instructions.
The first scene
Since every great production starts with splash screens, let’s not be different and do the same. Thus, let’s create a new scene (SplashScene) and add a black empty image as the background. We will show one text and another text with a picture sequentially. To do this, we will utilise Canvas Group and its Alpha property.
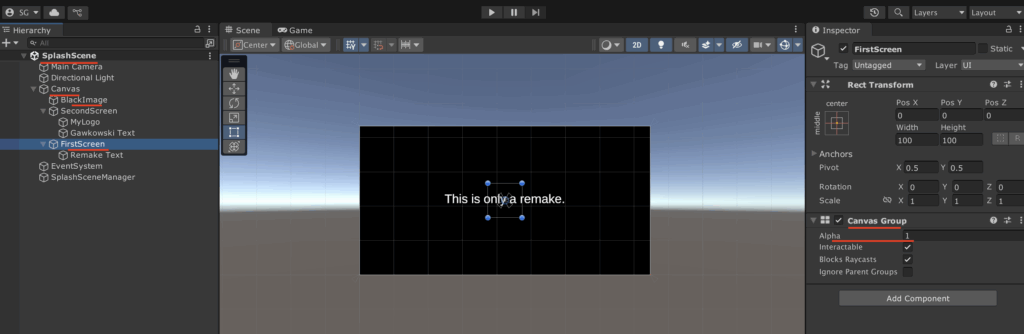
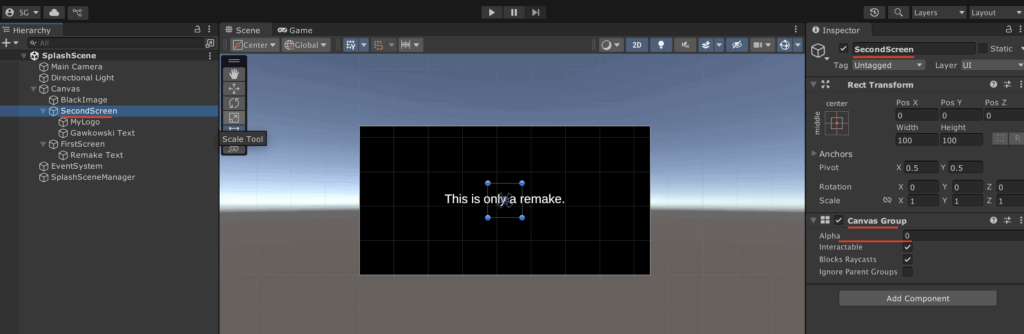
The last element is the so-called SplachSceneManager, an empty GameObject with a connected script that performs the fade-out effect.
public class SplashSceneManager : MonoBehaviour
{
    public string sceneToLoad;
    public List<CanvasGroup> screensToShow;
    public float delayBeforeFade = 0.5f;
    public float fadeDuration = 0.5f;

    void Start()
    {
        StartCoroutine(ShowScreens());
    }

    IEnumerator ShowScreens()
    {
        if (screensToShow == null || !screensToShow.Any())
            throw new Exception($"Empty {nameof(screensToShow)}");

        foreach (var screenToShow in screensToShow)
        {
            screenToShow.alpha = 1f;
            yield return new WaitForSeconds(delayBeforeFade);

            float logoOutElapsed = 0f;

            while (logoOutElapsed < fadeDuration)
            {
                logoOutElapsed += Time.deltaTime;
                float alpha = Mathf.Lerp(1f, 0f, logoOutElapsed / fadeDuration);
                screenToShow.alpha = alpha;
                yield return null;
            }
        }

        SceneManager.LoadScene(sceneToLoad);
    }
}The second scene
Now it’s time for the second scene, which will be equally interesting. Namely, as we saw in the first image, it will consist of a background and five objects arranged in a circle serving as menu elements. Navigation between these elements will be done using arrows (left and right). In addition, we will start music in the background and navigation with the arrows will trigger an additional sound.
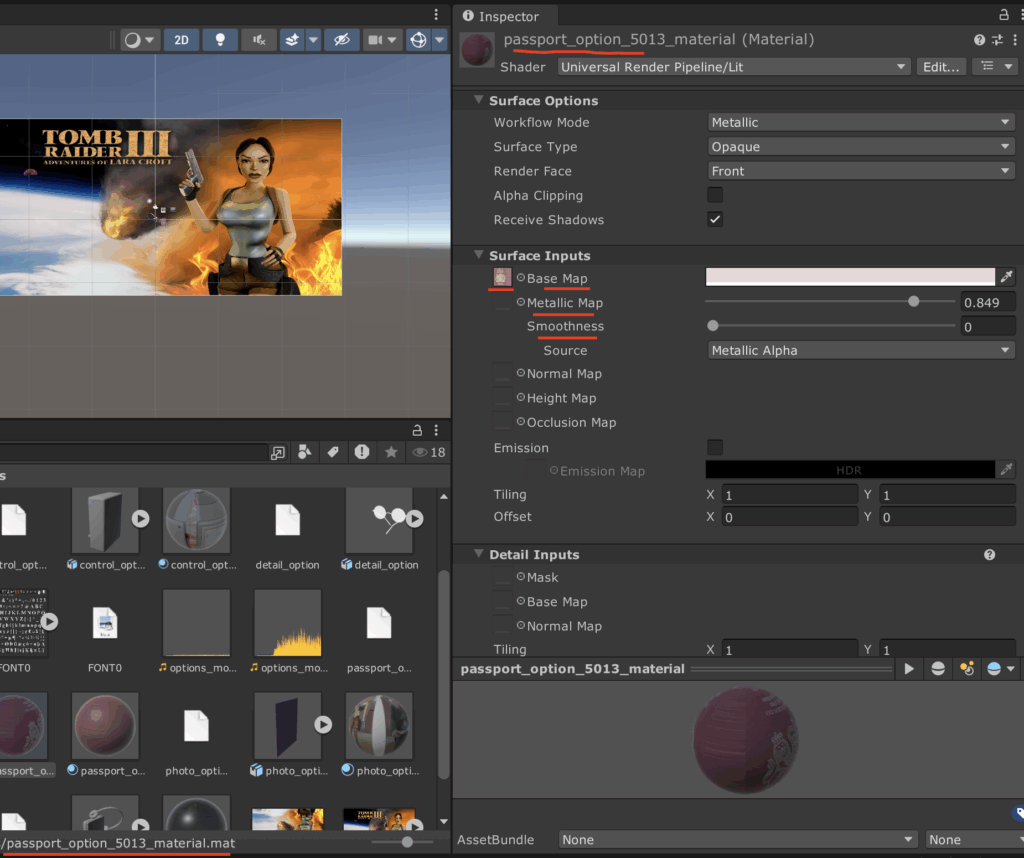
Let’s take care of our meshes. As we mentioned earlier, since we decided to use the OBJ format, after importing our objects into Unity, we need to “combine” them with textures. To do this, we need to create a material, use the appropriate texture as Base Map and experiment with the Base Map colour and Metallic Map and Smoothness. For example, this is my interpretation of the passport material 😀
Before placing menu items, we should
- add a
Canvas(Render Mode:Screen Space - Camera) with an image based onTITLE_EU.DDS - add an
Audio Sourcelooping5.OGG - add an empty
Game Object, which will be used as our menu items manager; let’s name itObjectsManager; all scripts manipulating our menu items will be attached to this object
Initial menu items arrangement
Can be done like this:
public class CircleArranger : MonoBehaviour
{
    [Tooltip("List of objects to arrange in a circle")]
    public List<GameObject> objectsToArrange;

    [Tooltip("Radius of the circle")]
    public float radius = 5f;

    void Start()
    {
        ArrangeInCircle();
    }

    private void ArrangeInCircle()
    {
        float angleStep = 360f / objectsToArrange.Count;
        float adjustmentToAlignTheLastElement = 270f - (objectsToArrange.Count - 1) * angleStep;
        for (int i = 0; i < objectsToArrange.Count; i++)
        {
            float angle =  i * angleStep + adjustmentToAlignTheLastElement;
            float rad = angle * Mathf.Deg2Rad;

            Vector3 newPos = new Vector3(
                Mathf.Cos(rad) * radius,
                0.5f,
                Mathf.Sin(rad) * radius
            );

            objectsToArrange[i].transform.position = OptionsPositionAdjuster.Adjust(
                newPos, radius);
        }
    }
}Here, our objects are arranged in a circle with radius radius on the XY plane. Additionally, the OptionsPositionAdjuster slightly increases the Y coordinates so that objects located further from the camera, i.e. with a higher Z coordinate, are positioned slightly “higher”.
Object rotation
Object rotation is more complicated, so we will only describe it briefly. First, note that the menu options rotate as you press the arrow keys.
void Update()
{
  if (Input.GetKey(KeyCode.LeftArrow) || Input.GetKey(KeyCode.RightArrow))
  {
    // left arrow key or right arrow key is pressed
  }
}Second, after the player stops pressing the arrow key, the rotation becomes inert and moves to the “closest menu item” (function AlignObjects()).
public Vector3 rotationCenter = Vector3.zero;
public float rotationSpeed = 90f;
public List<GameObject> objectsToRotate;

void Update()
{
    if (Input.GetKey(KeyCode.LeftArrow) || Input.GetKey(KeyCode.RightArrow))
    {
        float direction = Input.GetKey(KeyCode.LeftArrow) ? -2.0f : 2.0f;
        RotateAllObjects(direction);
        _alignAutomatically = true;
    }
    else if (_alignAutomatically)
    {
        StartCoroutine(AlignObjects());
    }
}

private void RotateAllObjects(float inputDirection)
{
    foreach (var obj in objectsToRotate)
    {
        obj.transform.RotateAround(rotationCenter,
            Vector3.up,
            inputDirection * rotationSpeed * Time.deltaTime);

        obj.transform.position = OptionsPositionAdjuster.Adjust(obj.transform.position, Radius);
    }
}

private IEnumerator AlignObjects()
{
  // AlignObjects() can use RotateAllObjects().
  // After each "slight" rotation we can wait
  //
  //     yield return new WaitForSeconds(0.5f);
  //
  // so that the
  // movement is observable to the player and spread out in time.
}The above algorithm can be extended to play sound when menu items move (like in the original game).
Final effect
Notice that the menu options have their labels displayed in the bottom center of the screen – just like in the original 😀 The font is different, but we’ll work on that later. The text display effect can be achieved by adding an additional Canvas with Render Mode equal to Screen Space - Overlay.
Have fun!